Running multiple domains on a single Zimbra mail server? You may need each domain to send outgoing email through a dedicated IP address — a common requirement for improved deliverability, IP reputation management, or compliance. This guide walks you through the complete, production-safe procedure using Zimbra’s Postfix layer.
Why Assign a Dedicated Outgoing IP per Domain?
- Email reputation isolation — keep one domain’s spam issues from blacklisting your other domains
- Deliverability — major ESPs (Gmail, Outlook) score reputation per IP; a dedicated IP for a high-volume domain avoids sharing with low-volume senders
- PTR / rDNS matching — each IP can have a unique reverse DNS record matching its HELO name
- Compliance — some industries require traceable, per-entity mail streams
Prerequisites
- Zimbra 8.x / 9.x / 10.x installed (all versions use Postfix internally)
- Root or sudo access to the server
- The dedicated IP already bound to a network interface (verify with
ip addr show) - A PTR (rDNS) record set for each dedicated IP pointing to its mail hostname
How Zimbra Manages Postfix Configuration
Zimbra generates Postfix’s main.cf from an internal template at runtime. Direct edits to /opt/zimbra/postfix/conf/main.cf are overwritten whenever Zimbra’s configuration daemon (zmconfigd) restarts. Use zmlocalconfig to set Postfix parameters persistently, and edit master.cf.in (not master.cf) for transport definitions.
Step-by-Step: Assign a Dedicated Outgoing SMTP IP
Step 1 — Register the Sender-Dependent Transport Map
Use zmlocalconfig to persist the sender_dependent_default_transport_maps parameter in Zimbra’s configuration store (so it survives upgrades and restarts):
su - zimbra -c "zmlocalconfig -e postfix_sender_dependent_default_transport_maps='regexp:/opt/zimbra/postfix/conf/sdd_transport_maps.regexp'"Then apply it to the live Postfix main.cf:
su - zimbra -c "zmconfigd && postfix reload"Step 2 — Create the Transport Map File
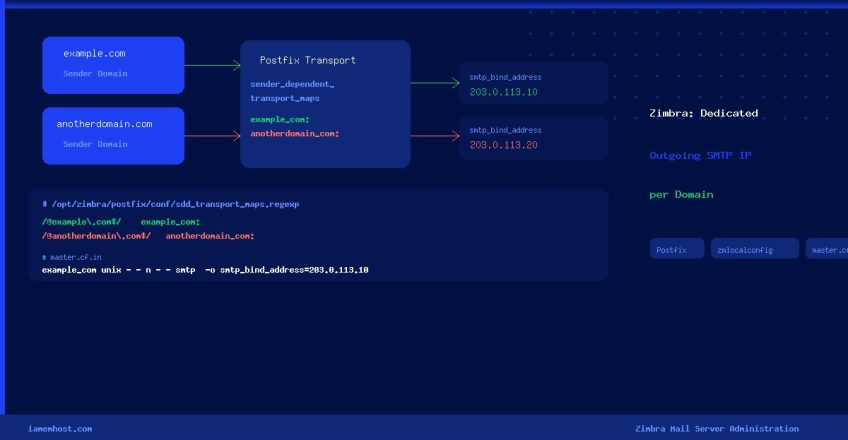
Create /opt/zimbra/postfix/conf/sdd_transport_maps.regexp and add a regex rule for each domain that needs a dedicated IP. The pattern matches the sender’s envelope domain and routes it through a named transport:
# Format: /regex/    transport_name:
/@example.com$/     example_com:
/@anotherdomain.com$/    anotherdomain_com:
Set correct ownership so Zimbra’s Postfix can read the file:
chown zimbra:zimbra /opt/zimbra/postfix/conf/sdd_transport_maps.regexp
chmod 640 /opt/zimbra/postfix/conf/sdd_transport_maps.regexp
Step 3 — Define the Custom Transport in master.cf.in
Edit /opt/zimbra/postfix/conf/master.cf.in (the template Zimbra uses to build master.cf) and append a transport stanza for each domain. Add the block at the end of the file:
# Dedicated outgoing IP for example.com
example_com unix  -       -       n       -       -       smtp
  -o smtp_bind_address=203.0.113.10
  -o smtp_helo_name=mail.example.com
  -o syslog_name=postfix/example_com

# Dedicated outgoing IP for anotherdomain.com
anotherdomain_com unix  -       -       n       -       -       smtp
  -o smtp_bind_address=203.0.113.20
  -o smtp_helo_name=mail.anotherdomain.com
  -o syslog_name=postfix/anotherdomain_com
Replace 203.0.113.10 / 203.0.113.20 with your actual dedicated IPs. The smtp_helo_name value should match the PTR record for that IP.
Step 4 — Apply the master.cf.in Changes
Regenerate master.cf from the updated template and reload Postfix:
su - zimbra
zmconfigd
postfix reload
exit
Step 5 — Verify the Configuration
Send a test email from each domain and confirm it leaves via the correct IP:
# Check the mail log for the outbound connection and IP
tail -f /var/log/zimbra.log | grep "postfix/example_com"

# Or use Zimbra's own log viewer
su - zimbra -c "zmlogger status"
You can also use an online mail header analyser (e.g., MXToolbox) to inspect the Received header in a delivered message — it will show the originating IP.
Configuration Reference
| Parameter | Where to Set | Purpose |
|---|---|---|
sender_dependent_default_transport_maps | zmlocalconfig / main.cf.in | Points Postfix to the per-domain transport map |
Transport map file (.regexp) | /opt/zimbra/postfix/conf/ | Maps sender domain → named transport |
smtp_bind_address | master.cf.in transport stanza | Forces outbound connections to bind to a specific local IP |
smtp_helo_name | master.cf.in transport stanza | Sets the EHLO hostname for SPF / PTR alignment |
syslog_name | master.cf.in transport stanza | Prefixes log lines for easy per-domain filtering |
Troubleshooting
- Transport map not matched — check the regex syntax; test with
postmap -q "user@example.com" regexp:/opt/zimbra/postfix/conf/sdd_transport_maps.regexp - Permission denied on bind — ensure the dedicated IP is actually assigned to the server’s NIC (
ip addr show); Postfix cannot bind an IP that isn’t locally configured - Changes reverted after restart — you edited
main.cfdirectly instead of usingzmlocalconfig; repeat Step 1 - SPF failures on the new IP — add the new IP to your domain’s SPF record:
ip4:203.0.113.10 - DKIM signatures failing — DKIM signing in Zimbra is handled by
amavisdbefore the message reaches the custom transport; no extra DKIM config is needed
Conclusion
By combining Postfix’s sender_dependent_default_transport_maps with per-domain transport stanzas in Zimbra’s master.cf.in, you gain precise control over which IP each domain uses for outbound mail. The key takeaways: always use zmlocalconfig for main.cf parameters (to survive Zimbra restarts), always edit master.cf.in (not master.cf), and verify each domain’s SPF record includes its newly assigned IP.

Bash Script to Alert When Exim Mail Queue Is Too High
IAMEM HOSTING HOSTHow to List All Installed CMS Versions Across All Hosting Accounts
IAMEM HOSTING HOST